Flower Love
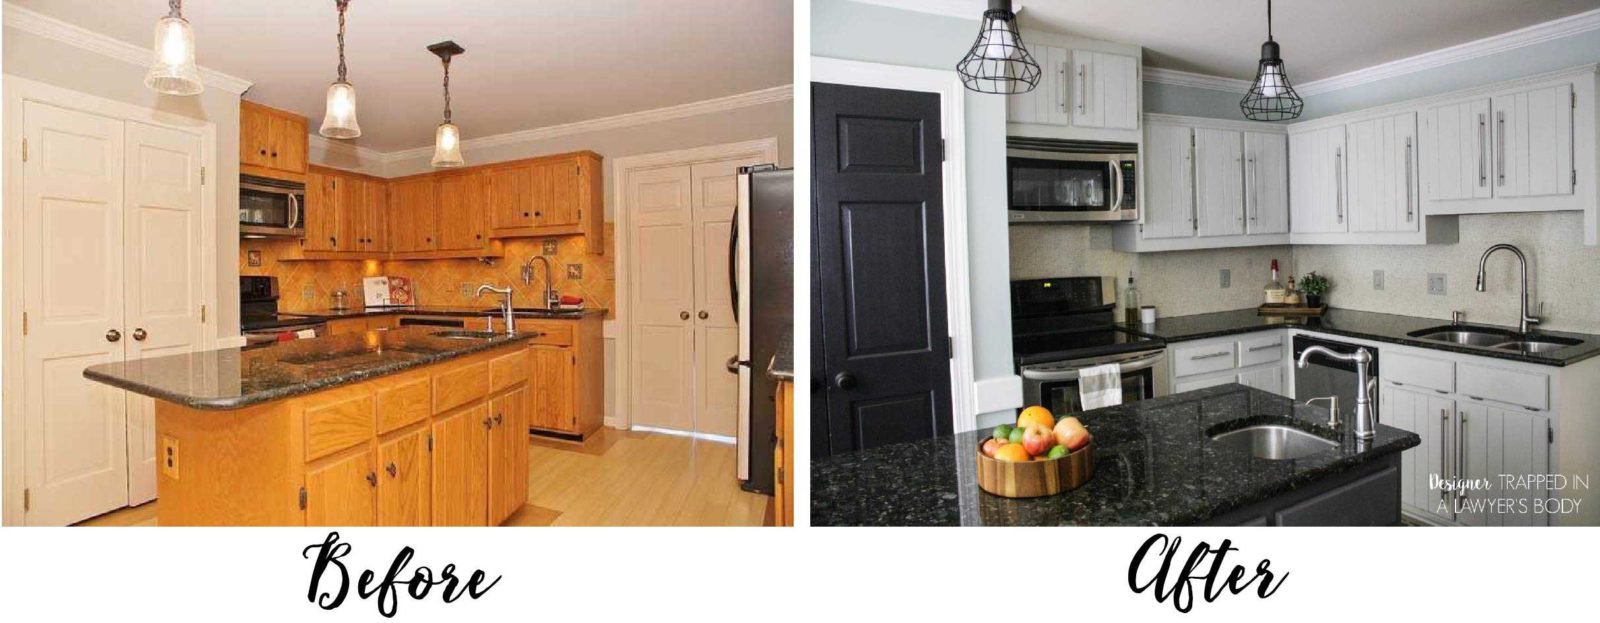
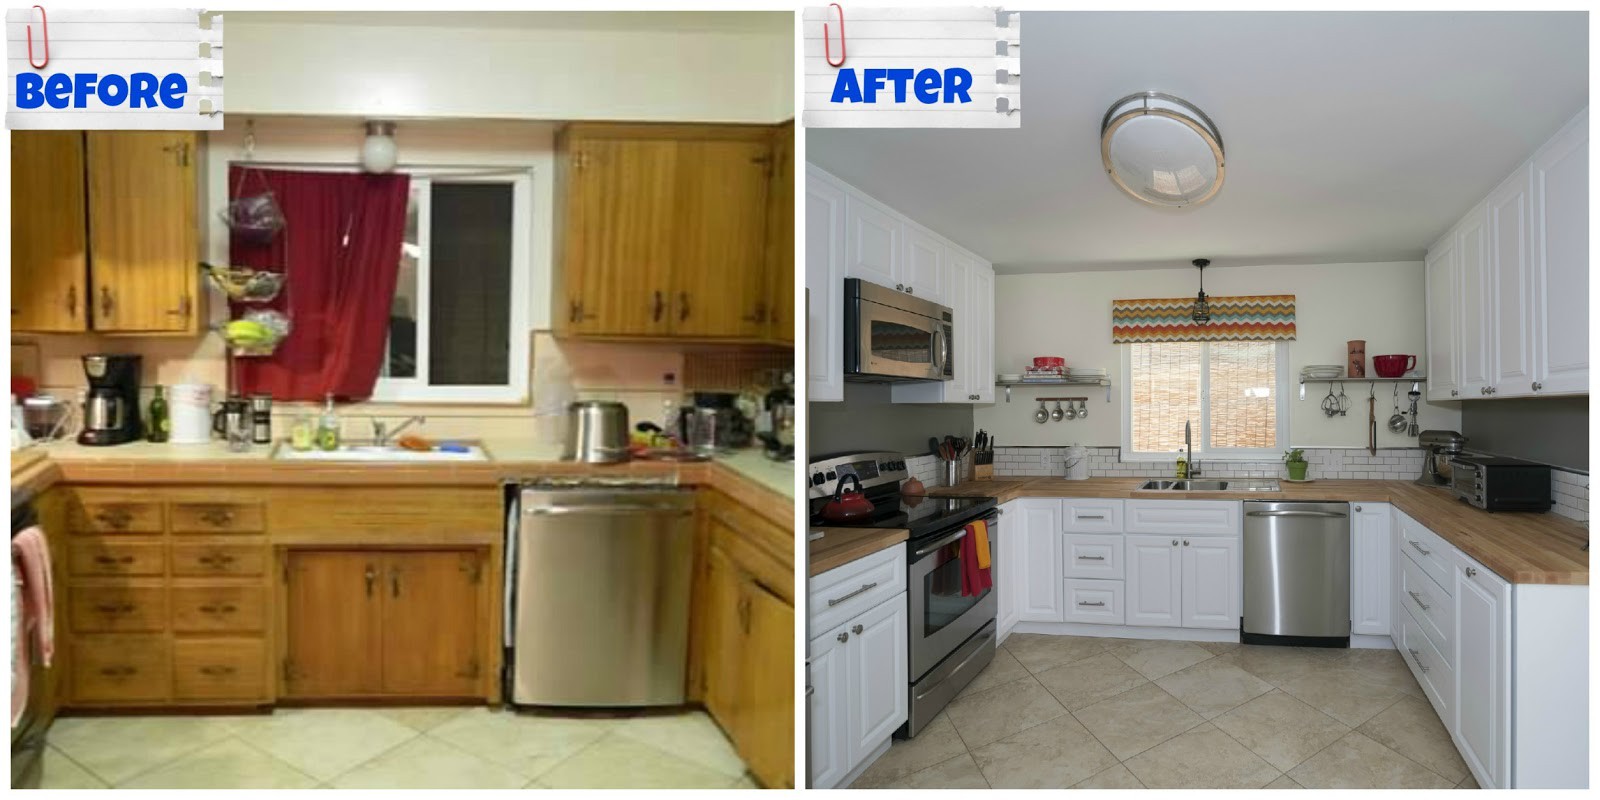
It does not always have to be a new kitchen. An old kitchen can be quickly and easily transformed into a new piece of jewelry by a new coat of paint or other simple tricks. The DIY kitchen renovation is not just for talented craftsmen. With our tips and tricks, this also works for kitchen owners with two left hands in an instant!
Repaint kitchens
A simple and versatile way to change the color of the kitchen is a new coat of paint. The painting of kitchen fronts and kitchen cabinets sounds like a lot of work at first, but is basically very simple. In addition, you can play with different materials, colors and paints. For example, wood fronts can be cleaned, lightly sanded and glazed. So you make sure that the wood pattern is still visible.
Paint kitchen – step instructions:
- First remove the handles and buttons
- Thoroughly clean the kitchen furniture and make sure that no greasy residues are left. This works particularly well with a mixture of ammonia, water and detergent.
- Better damage to the surfaces with a suitable paint spatula
- Loop the surfaces and clean them again until no more dust is present
- Notice that the kitchen is well taped so the paint will only land where it should be.
- Now it’s time to paint: Apply the paint layer by layer with a brush until the desired result is achieved. You may also want to apply a primer to keep the color better and more intense.
- Allow enough time for the surfaces to dry
- After drying for at least 12 hours, you can apply a seal if necessary.
Renew kitchen fronts with adhesive foil
Less effort and a just as big effect provide adhesive films. A kitchen that has gone out of style can easily be turned into a piece of jewelry. Matching slides are available from a wide range of suppliers. When buying, you should make sure that the blanks in any case correspond to the size of your fronts.
Apply adhesive film – Step by step:
- Clean the surfaces to be stuck. It is important that they are dry, free of grease and dust.
- Compare again the dimensions of the adhesive film and the fronts. If necessary, cut the film. If you are using adhesive sheets with a pattern, also pay attention to the correct order.
- If the film is tensioned at the top two corners, attach the film to the top of the fronts. Now you can pull off the film and press gently. Spread the film over it from top to bottom.
- If there are wrinkles or blisters, remove the dirty parts and smooth the film again.
- If everything fits the way you want, press the film firmly again – especially on the edges
Exchange fronts and handles of the kitchen
New kitchen fronts
Another possibility is the replacement of the fronts. Most kitchen manufacturers have different kitchen fronts in their assortment. This makes it easy to replace outdated or scratched fronts with new fronts in different colors and materials. Most kitchen systems are made up of standardized components, which is why the replacement is basically no problem. Alternatively fronts can also be made to measure. Of course, the exchange is certainly more expensive than the DIY variants. Nevertheless, new kitchen fronts are a cheap alternative to buying a new kitchen.
New kitchen handles and knobs
Far cheaper and the easiest way to bring a little pep in the old kitchen, is the change of kitchen handles and pommels. Often such an exchange can change a whole kitchen. The possibilities are unlimited. Everything is open with different materials, colors and shapes. It is important only that the old kitchen handles are removed first and the distance or the length are measured exactly. Otherwise, at the end even new kitchen handles are bought, which do not fit on the old fronts.